Skills Needed
- Science III (Core Probe Launcher)
- Astrometrics III (Core Probe Launcher)
- Caldari Frigate II (Heron)
- Astrometric Rangefinding III (Improves scan probe strength)
- Astrometric Pinpointing III (Reduces scan probe deviation)
These are just the essentials. Improving Astrometrics lets you put more probes in the sky. Improving Rangefinding and Pinpointing will aid you in finding harder Wormholes and anomalies.
Ships Needed
As the Caldari have racial boosts to scanning and electronic nonsense, the Daily Poddite prefers these ships for all its scanning purposes. For introductory pilots, we recommend the Heron:

However, for pilots who plan to spend significant time in Wormholes, the Buzzard is the only way to go!


Scanning
Make sure your ship has plenty of Probes (Core Scanner Probe I) and enter space. Launch 4 or 5 probes immediately, then warp to a safe spot. If you have a cloaking device, activate it.
Open up your scanning tool. You will find it here:

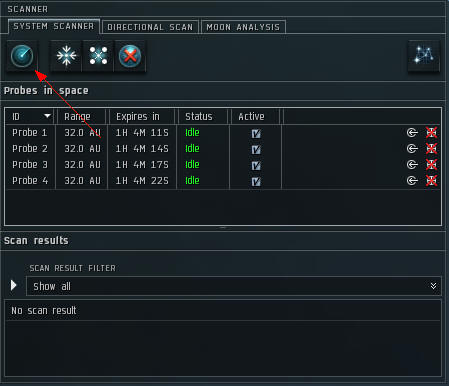
It looks like this once you open it:
The items in the top half are your probes. You don't really need to worry about them that much, except you don't want to leave them. Probes last a little over an hour. The Daily Poddite has never lost a probe in this manner, but nonetheless, keep an eye on that timer.
Hit F10 on your keyboard, or use the icon button to transfer to map view. You want to be in a view of just a single system, not the entire galaxy. Maneuver the camera to a probe, which looks like this:

You move your probes by left-clicking on the directional arrows. You will drag your probe in the direction of the arrow. So, if you click the top most arrow, you will move it up on the Y axis. If you pull any of the cardinal direction arrows, you will move it in that direction on the X axis. If you click the box, you can move the probe freely.
One by one, move each of your probes into a corner of the current system. Then, shift + left click on the blue orb surrounding one of the probes. Drag that out to maximize the scan range of the probes. By holding shift, you are selecting all probes. This is a key tool for scanning. This is what your setup should resemble (I am zoomed out quite far for the image):

Once your probes are in place, hit the Analyze button on your scanner tool window.
This is what you should see:

After a few seconds, results will show up. (Note: It's possible nothing will appear. This may be because your probes are placed in a way that they missed everything. It's also possible there is nothing in system. Move your probes around once or so more. If nothing shows up, move on to another system!)

Notice that the top two items are already 100%. Some sites are incredibly easy to scan. Right click them in this window and select "Bookmark Location." You can then warp to it. But for now, let's scan down a site. There are a few things to note before we proceed:
- The ID column lists the names. Use this to select one and stick to it. The Daily Poddite recommends you scan one site at a time.
- The Type column tells you if it's an encounter, wormhole, or one of the many types of sites.
- Signal Strength more or less tells you how close you are to finding the anomaly, but isn't the only indicator.
Let's select VTC-542.

This is what shows up (Note: If you pick a single ID in the panel shown above, you'll only see results for that site)

Notice the red dot in the center? This means that we have 3 Probes on it at the moment. However, we need to adjust them to be a bit more precise. Let's adjust the height first.
Angle your view so that you are looking at the dot from the side. Like this:

If you look closely you'll notice the red dot is below the spheres, which is why it isn't lit up. This means are probes aren't currently hitting it. If we shift + left-click the downward arrow on one probe, we can move all probes to the same height as the anomaly.

Adjusting for the Y-axis should be the first thing you do. Then, you should adjust your probes on the X-axis. You basically want to have one probe on each of the cardinal directions (Note: If you are scanning with 5 probes, which may be necessary due to lower skills, position the fifth probe directly on top of the dot).

Notice that the red dot is in the center of the four. Also, notice that the sphere for each just barely clips over. You want to create a four-way Venn Diagram with the anomaly in the center. Let's hit analyze and scan again.

Notice that there is a red-sphere now (don't forget to re-select the correct ID on the window on the left!)? This means that only two of our probes are now hitting the anomaly. The anomaly hasn't moved, but you haven't narrowed it down yet. Shift + left click on the left facing arrow of one of the probes and move all probes a little to the left.

After a little back and forth, we get the following:

With the red dot again, we're going to reduce our spheres to an 8 AU scan range. Remember, shift + left click on one sphere and move them all inwards. By doing this, we're reducing the range of our scan and making each scan far more accurate.

If you read the scan window, you'll notice that the scan strength is up to 13%! We're making progress.

26% now! Scanning is much like prospecting for gold in a river in the early 19th century. You filter in water, shift the pan, and get rid of the sand. Scanning is like trying to find a needle in a galactic haystack, so you need to constantly tweak the location of your probes and reduce their scanning size (by dragging the spheres inwards).
At 60% we've hit a bit of a problem.

The single red ring means only a single probe is hitting the anomaly. This probably came up because I moved my sphere too tight or slightly mis-adjusted my spheres. You can always move the spheres back out to get your bearings. After a little fiddling, I find it again.

A yellow dot, as seen above, is your best friend. It means all four of your probes are hitting the site. At this point you are almost finished! I continue to reduce the size of my spheres.

Ultimately, the Daily Poddite is victorious! Did you ever doubt?

The green dot means you are at 100%. At this point, right click on the item inside the scan window and bookmark it.

Then, recover your probes! No reason to leave them in space.

Once the site is bookmarked you are able to warp to it. We'll cover the sites themselves and proper wormhole tactics in part 2 of this guide!
Here is a youtube video of scanning in action.
Here is a youtube video of scanning in action.
Nice guide. Very clear and concise. Be sure to post a link on the boards, too.
ReplyDelete